Cox Email Discontinuation
Due to the influx of call related to the Cox Email transition, please refer to the following steps to assist in setting up your email through Yahoo.
If you have reviewed the following notes and still need assistance, please call our support line @ 402-350-0372 X 1 and leave a Voicemail containing your full name, phone number, and specify that you are calling about the cox email issue.
There is a large volume of calls so we will call back from the voicemails in order that they come in. Thank you!
Cox to Yahoo Transition - Outlook Setup
With the transition from Cox to Yahoo, there are now a few steps that need to be taken to reconfigure your email to work with Outlook. Below, we've outlined the procedure to configure your new email settings.
Please note, the following steps are only necessary if you are on outlook 2010, 2013, 2016, or 365, or if you are using Mail on Mac. If you are using the New Outlook  please skip to the "New Outlook" section.
- Sign in to your Yahoo Account Security Page
- You can find your Yahoo account security page at the following link: https://login.yahoo.com/account/security?.lang=en-US&.intl=us&.src=yhelp
- Once logged in, you should find yourself at the following page:
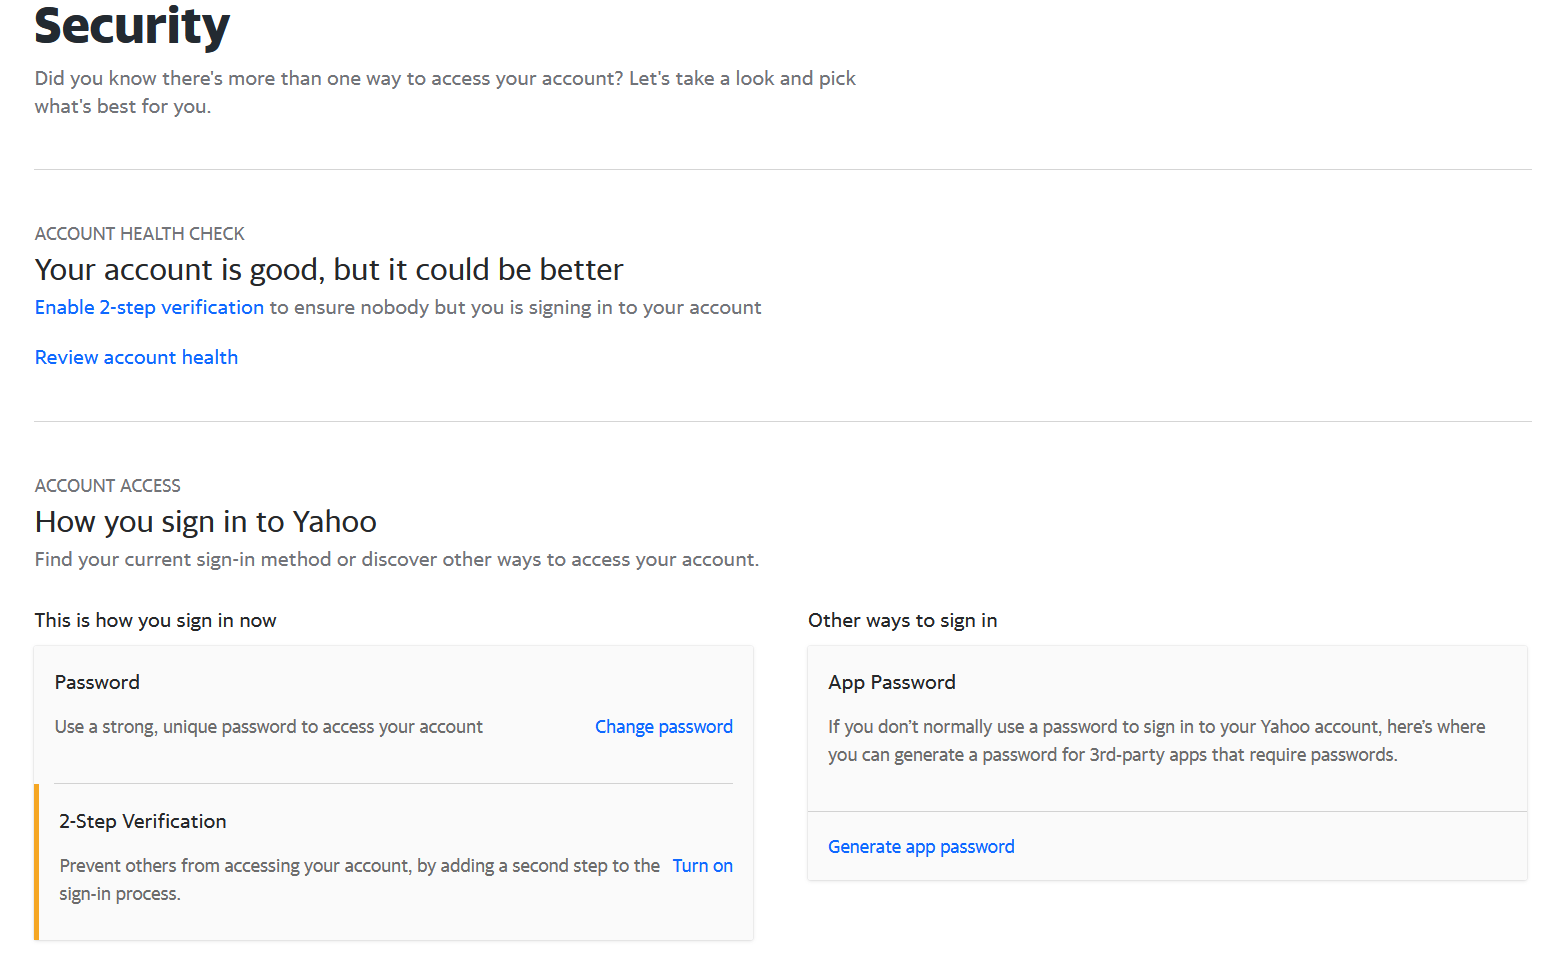
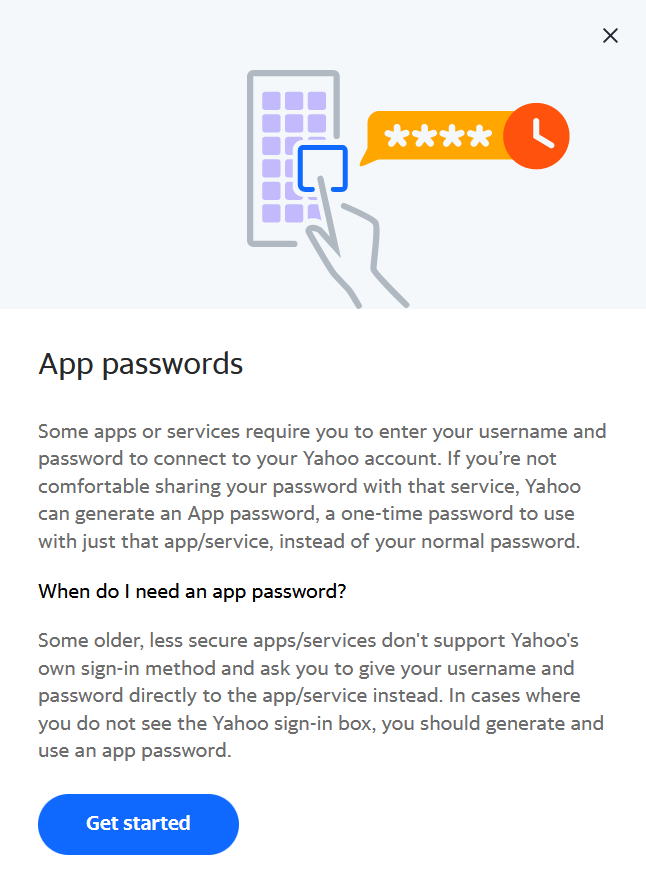
- Select the "Generate app password" Button
- Because of modern authentication methods, it is now necessary to generate and use a special password in order to link your yahoo email account with any third party app such as Outlook
- If you have already generated app passwords before, this button may read "Generate and manage app passwords"
- Press the "Get Started" button
- On the resultant screen, enter a name for this app password.
- Since we are generating this password for Outlook, let's use the name "Outlook Password"
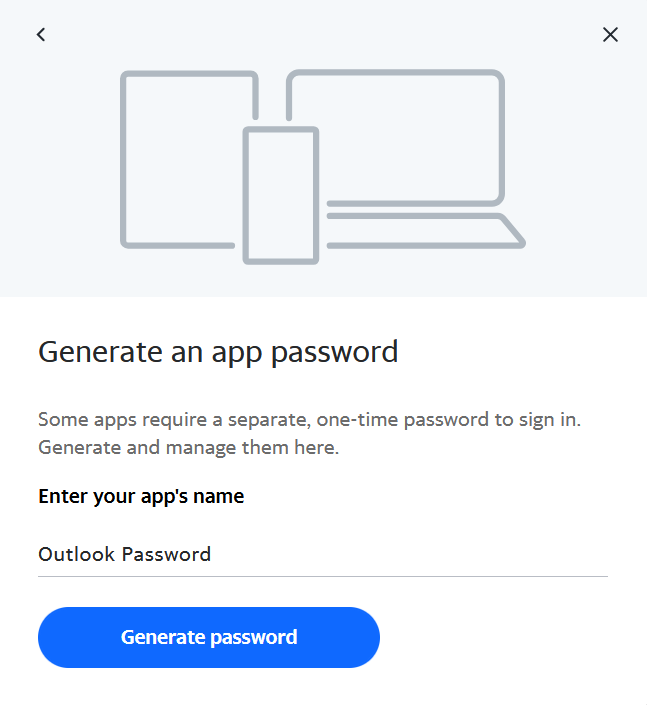
- Press the "Generate Password" button
- This will generate a password that Outlook can use to link your account
- Once you close this screen, you may not be able to view this password again, so make sure you copy down the password and verify you have written it down exactly as it appears on the screen. This password is case-sensitive
- This app password will remain valid even if you change your cox.net email address password. However this app password cannot be used to log into your account directly. It is only used for apps such as outlook to connect to your account.
- Copy the app password
- To avoid any misspellings, we recommend you copy the app password directly. Highlight the password by clicking and dragging over the password. Then press Ctrl+C to copy, or right click on the highlighted text and click "copy."
- Open the Outlook Application
- Now, we will need to update settings in your mail application in order to ensure it can communicate with the yahoo mail servers
Outlook 2010, 2013, 2016, and 365
- Click the "File" button in the top left of the application

- This will take you to your Account page
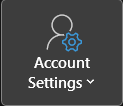
- Click on the "Account Settings" button near the top of the page, then select "Account Settings" from the dropdown list
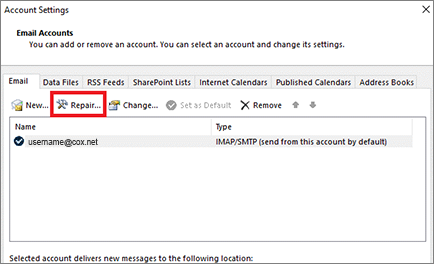
- This will bring you to the Account settings screen. In this screen, click on your cox.net address
- Since our company does not use cox.net addresses, we will be utilizing one of our employee's emails for this visual example

- Once selected, click on the "Repair" button from the menu above
- Click the dropdown arrow next to "Advanced Options" and select the "Let me Repair My Account Manually" checkbox
- Click the blue "Repair" button
- Confirm your cox.net email address is correct in the username field
- In the password field, paste the app password you generated from your Yahoo Security page.
- This is the password you copied in step 6 of the first section of this article
- If you copied this password, you may paste by pressing Ctrl+V, or by right clicking on the password field and selecting the "paste" option
- If you did not copy this password, or the paste function does not work, retrieve the app password you wrote down and type it in manually
- Do NOT enter your normal login password in this field
- Once you've entered your app password, move on to the IMAP/POP settings.
- You may use either IMAP or POP, but we recommend using IMAP. Make sure you select one or the other, and then follow the instructions for the one you selected
- Once you've selected either IMAP or POP, you should be taken to a screen with with both an Incoming Mail and Outgoing Mail section. Start with the Incoming Mail section
- IMAP
- In the Server field, type in imap.mail.yahoo.com
- In the Port field, type in 993
- In the Encryption Method field, select SSL/TLS from the dropdown menu
- Leave the checkbox below these settings un-checked

- POP
- In the Server field, type in pop.mail.yahoo.com
- In the Port field, type in 995
- Select the checkbox for This server requires an encrypted connection (SSL/TLS)
- (We are unable to provide a visual example at this time)
- Once the Incoming Mail section is filled out, select the dropdown arrow next to "Outgoing Mail", and replace any existing settings with the following
- In the Server field, type smtp.mail.yahoo.com
- In the Port field, type 465
- In the Encryption Method field, select SSL/TLS from the dropdown menu
- Do not adjust the Server Timeouts slider
- Do not check the box next to Require logon using Secure Password Authentication (SPA)
- Do check the box next to "My outgoing (SMTP) server requires authentication"
- Once checked, select the option for "Use same settings as my incoming mail server"
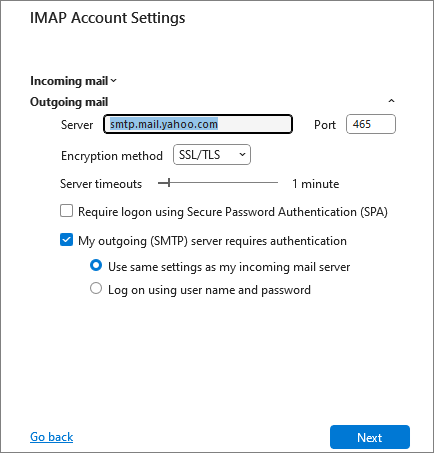
- Once all fields are complete, hit the "next" button
- Outlook may run some tests on the connection, after which a message should appear that says "Account successfully repaired". Once this message appears, you may close out of your account settings.
- If this screen does not appear and Outlook reports any errors, contact us for further support.
- Congratulations! Your email should now be working in Outlook.
Mail on Mac
- First, open Mail on Mac
- Click on Mail in the top left corner, then on Preferences, then Accounts
- On newer versions of the application, you may need to click on Mail, then Settings, then Accounts
- On newer versions of the application, you may need to click on Mail, then Settings, then Accounts
- Select your cox.net email address from the list of accounts by clicking on it
- Click on the "Server Settings" tab
- Find the checkbox labeled "Automatically manage connection settings" and remove the checkmark next to it by clicking on it
- Make sure your cox.net email address is correct in the User Name fields for both the Incoming Mail Server and Outgoing Mail Server sections
- Enter the app password you generated in step 5 of the first section into the password slot for the incoming mail server section
- If you copied your password, you may paste it by pressing ctrl+v or by right clicking on the field next to "Password" and selecting Paste from the context menu
- If you did not copy your password, type in the app password you wrote down manually
- Do NOT attempt to use your normal login password in this field, only the app password you generated will work
- If you copied your password, you may paste it by pressing ctrl+v or by right clicking on the field next to "Password" and selecting Paste from the context menu
- For the Incoming Mail Server section, adjust settings as follows
- In the Host Name field, type in imap.mail.yahoo.com
- In the Port field, type in 993
- Select the check box next to use TLS/SSL
- In the Host Name field, type in imap.mail.yahoo.com
- For the Outgoing Mail Server Section, click the arrows next to the Account section to open the dropdown menu
- Choose "Edit SMTP Server List" From the dropdown
- Enter your previously-generated app password in the password field, just like in step 7
- Adjust settings in the Outgoing Mail Server section as follows
- In the Host Name field, type in smtp.mail.yahoo.com
- In the Port field, type in 587
- Select the check box next to use TLS/SSL
- Confirm your settings look like the following screen.
- Please note that "username@cox.net" is being used as an example. The User Name field should have your cox.net address
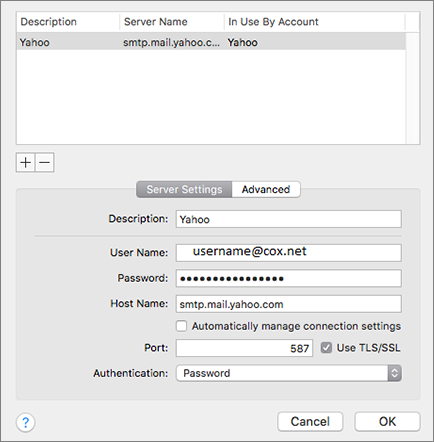
- Click OK
- Click Save
- You may see a "Verifying Server Settings" message for a few seconds
- Once complete, Mail on Mac should be configured with your new email settings, and your email should be working
- If for any reason your mail is not working after these steps, please feel free to reach out to us for assistance.
New Outlook
Since New Outlook supports a different set of features than older versions of Outlook, it is necessary to use a different process to set up and reconfigure email accounts.
- Open New Outlook
- Click on the Gear icon in the top right of the application to go to your settings menu
- This should open to the Email Accounts page
- If your cox.net email address does not appear here, skip to step 7
- If your cox.net email address does appear here, please proceed to the next step
- If your cox.net email address does not appear here, skip to step 7
- Find your cox.net email address in the list and select the "manage" button to the right of the email
- In the next screen, press the "Remove" button

- This will sign you out of your email on New Outlook
- If your cox.net address was the only email in New Outlook, you will be returned to the sign-in screen.
- If you had other accounts in New Outlook and you were not returned to the sign-in screen, please hit the "+ Add account" button and proceed from there. The remaining steps should be the same

- On the Sign-in screen, type in your cox.net address
- For the purposes of this demonstration we will be using a yahoo.com address as this is functionally the same:
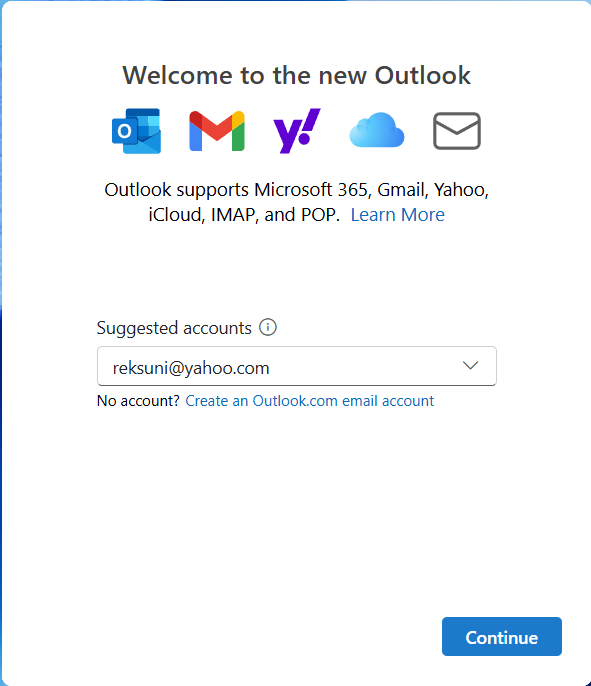
- Hit the "Continue" button
- You will be prompted with a screen saying that your account needs to be synced to the microsoft cloud. Hit continue on this screen.
- This should open a browser window to a yahoo page
- If you are already signed into your email address on the web, you should be presented with the following page:
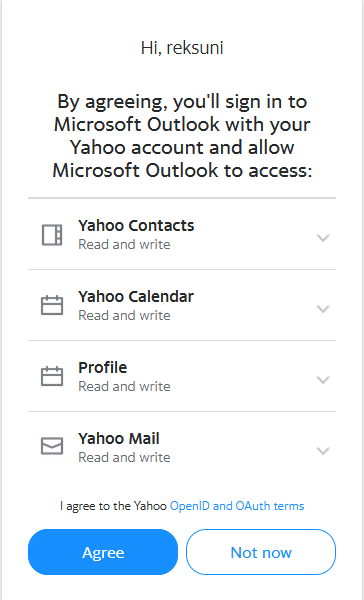
- If you are not yet logged in, you will be presented with a login screen. Once logged in, you will be redirected to the above page
- Click the "Agree" button on this page
- New Outlook should Automatically sync your cox.net account to the application
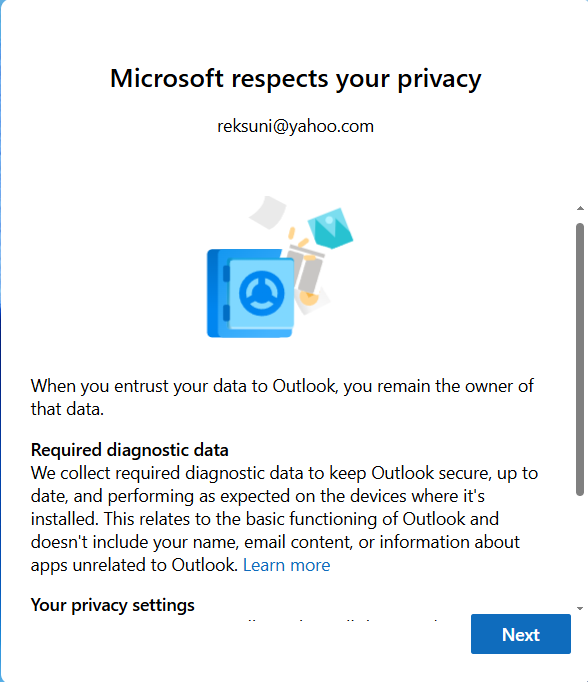
- Hit "Next" on this screen to proceed, then select whether or not you would like to send optional data (neither option will impact performance, you may make either choice) and hit "Accept"
- Hit "Continue"
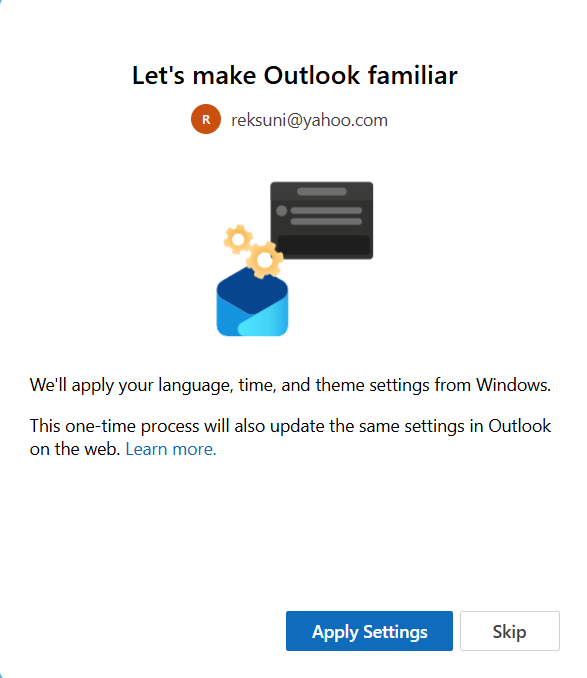
- You will be brought to this screen. You may choose to apply the theme from your PC, which will change colors and layout to match your windows settings, or not. We recommend hitting "Apply Settings", but you may skip if you wish
- New Outlook should now go through the process of setting up your mailbox, after which you should be brought to your inbox
- Congratulations! Your email is now configured
